SewMona

A slice of my Florida life

  • Sewing
    • SewMona on Etsy
    • Clothes
      • Boys
      • Girls
      • Men
      • Women
    • Pattern Reviews
    • How to Sew
  • Camping
    • Florida Campgrounds
  • Recipes
  • Crafts
  • DIY
  • About

How to Sew – Making A Polo Shirt Smaller

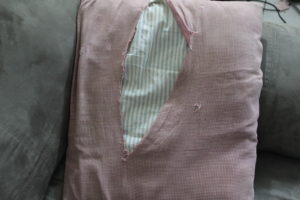
The private school where I teach (along with DH and our kids also attend) requires us to wear polo shirts.  Polos are one thing I’ve never tried making.  I buy the $5 ones at Old Navy during our tax free weekend.  Occasionally I find them at a thrift store for less than $5.  Last year, I managed to get a hole in my navy blue polo.  It was still in really good shape otherwise.  I hated to throw it away!

Navy blue polo with a hole near the hem

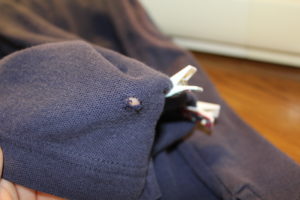
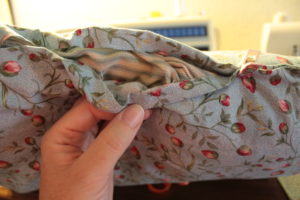
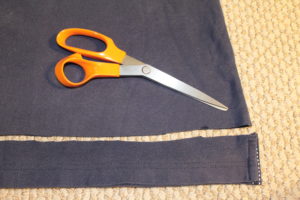
It really is a little hole and lucky for me (and my daughter), it’s below where the hem needs to be for her.

Navy blue polo with a hole near the hem.

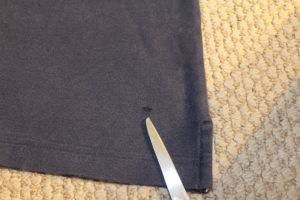
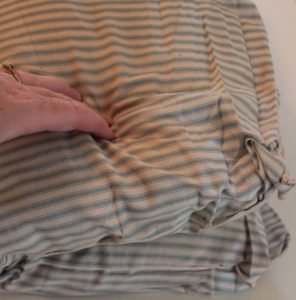
So, I just trimmed it off.  Ignore my horrible cutting…I just eyeballed it and clearly didn’t do a very good job.  Hemming will fix that!

Trim the hem off the polo

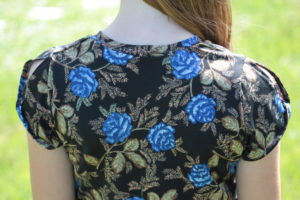
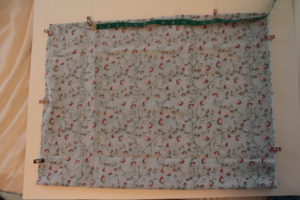
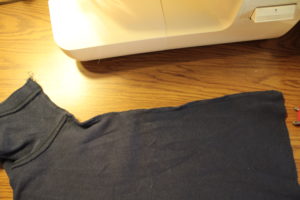
I also took the side seams in a bit so it wasn’t quite so baggy on her.

PoloSideSeam

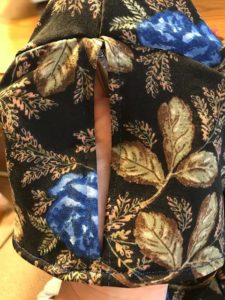
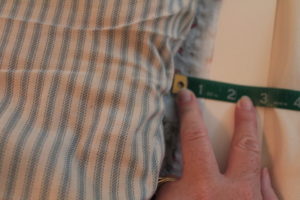
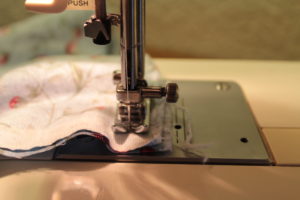
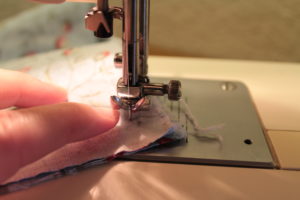
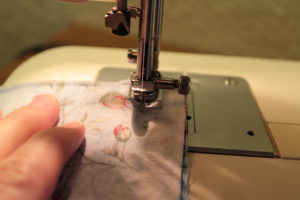
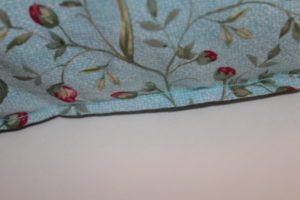
Turn up the hem – I turn under 1/4″ and then another 3/4″ so the hem looks neat and you don’t see any unfinished edges.

PoloHemClipped

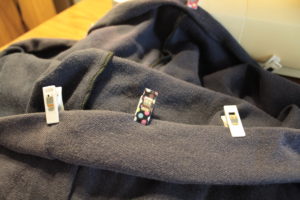
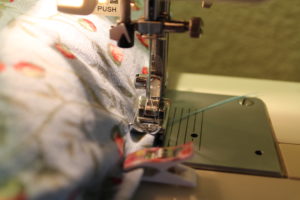
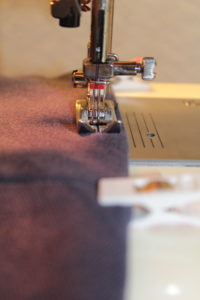
Hem the shirt with a double needle for a professional finished look.  Make sure to hem with the right side up if you’re using a double needle.  Also, this is one of the many reasons I love these clips – it doesn’t matter which way I put them on, I can sew with either side up.  With pins, you have to sew with the side you pined facing up.

Hem the polo with a double needle for a professional finished look

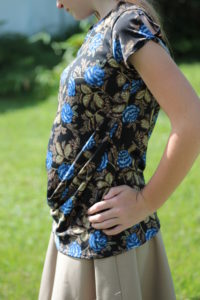
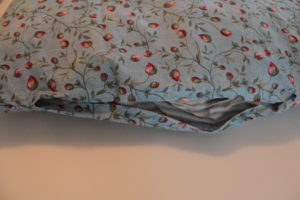
The finished product – a pretty good fit for my teenager and there are no holes in it!

Pattern Review – Tara Top by Made for Mermaids

*This post contains affiliate links.

The new Tara Top by Made for Mermaids is another excellent pattern.  It’s full of options and will work for all four seasons!  Living in Florida, I only made the short sleeve version (I can’t convince her to wear tank tops).

Tara top by Made for Mermaids front view

One of the unique features of this top is the twist on the side.  It’s perfect for those drapey knits!

Tara top by Made for Mermaids side view

It just looks so breezy and cool!  This shirt has short sleeves with no twist – just regular short sleeves.

Tara top by Made for Mermaids size view no twist sleeve

Another one of the unique features is this twist sleeve.

Tara top by Made for Mermaids twist sleeve close up

If you happen to forget to put the twist in when you attach it to the body, that’s OK – it still looks nice!  I did take the sleeve off and redo it since I really wanted the twist.

Tara sleeve without the twist

The pattern is $9 and there’s also a Mama Tara (also $9) so you can get both patterns and make Mommy & Me outfits.

*This post contains affiliate links.  See my disclosure policy for more details.

How to Sew – Making a Pillow

I’m going to assume here that you have very little sewing experience.  If you need a reminder of the basics of sewing, this post is for you.  If you want to teach your kids to sew, this post might be for you.  If you’re looking for my next post with a pattern recommendation – this is not the post.  Sorry, I thought maybe I should go over some basics first.

I’m not actually making a pillow; I’m just recovering one.  Maybe you have a well loved pillow that could use a new lease on its life.

The easy part is ripping off the old pillow cover.  Then you need about 3/4 yard of fabric.  Depending on how wide it is and how big/small your pillow is, you might be able to get away with 1/2 yard.  If you want to make a new pillow, you’ll need a bag of stuffing too. If your pillow is really flat, you can fold it in half to make it fluffier.

Lay your pillow out on your fabric.  Leave an inch border to allow for the seam allowance (1/2″) and a little for the puffiness of the side.

Fold the fabric over the top of the pillow and match up the edges.  Make sure that they meet with 1/2″ leftover for the seam.  Cut any extra fabric off.  You should now have a rectangle of fabric that fits nicely over your pillow.

Put the pillow to the side.  Fold your fabric in half right sides together (side note – Most of the time when you’re sewing two pieces together, you’ll do it with the right sides together.  Then when you turn it right side out, you won’t see the seams).  Pin or clip the sides together.  Leave an opening on one side so you can replace the pillow.  I like to leave it in the middle of a seam.  It needs to be about 2/3 of the opening – big enough that you don’t have to fight to get the pillow back in.

Now you’re going to sew the sides together using a 1/2″ seam allowance.  My sewing machine has markings for different seam allowances.  I measure from my needle to the lines to figure out which one was 1/2″.  Then I make sure the edge of my fabric stays on that line.

Use Marks on Your Machine for Seam Allowance

When I get to a corner, I sew to what I think is close enough so that when I turn the corner, my edge is lined up with the line.  Make sure the needle is down and lift the presser foot.

Sewing Turn Corner

Turn your material and see if the edge lines up with your line.

Turn the corner

In this case, it didn’t, so I turn the material back and sew another stitch or two.

Seam isn't sewn quite far enough

Turn it again and this time it does line up.  Make sure to put the presser foot back down.  It’s just about impossible to sew with it up!  Finish sewing your edges together remembering to leave your opening for stuffing.

Sew another stitch then turn the corner

Every time you start or end a seam, you need to go backwards a couple stitches and then forward a couple.  So, when you start, you sew a couple stitches, then push your reverse button and go back a couple, then go forward and finish your seam.  When you reach the end (not a corner, but the very end of the seam), back up a couple stitches and go forward again.

Back stitch at the beginning and end of each seam

Make sure you trim your thread ends too.

Don't forget to clip your thread ends

Turn the pillow cover right side out.

Finished pillow cover

Then comes the fun part – stuffing the pillow in.  Depending on how large or small you made the opening, it may be easier or harder.  I tend to make them as small as I can….  I folded my pillow in half to make it easier to stuff.  Once I get it in the case, I can unfold it and make it lay right.

Stuff the pillow into the case

One last step – closing up the opening.  There are two choices – hand sew or machine sew.  If you’re making a fancy pillow, you probably want to hand sew it since it’s easier to hide your stitches.  I despise hand sewing and avoid it at all costs!  On a side note, I do enjoy counted cross stitch…go figure.  So, I’m going to sew this shut on my machine using thread that’s as close to matching the fabric as possible.  Turn the edges to the inside.

Fold seam to the inside

Then clip it closed.

Clip the seam together

It can be hard to get a pillow up close enough to your machine to sew, but to me it’s worth it to not hand sew!  This time, I want a very narrow seam, so the edge of my seam is just under the edge of the presser foot.  Go slow and make sure your seam stays together.  There’s nothing more frustrating than thinking you’re done and realizing that the bottom part slid out and didn’t get caught in the seam!

Carefully sew the opening closed

The seam will look similar to this.The finished seam

Admire your new pillow.Your new pillow is ready for use

Pattern Review – Little Loungers by Patterns for Pirates

I recently tested the Little Loungers pattern from Patterns for Pirates.  I wasn’t sure about the pattern when I started.  I was having a hard time figuring out what fabric to use.  I didn’t want to make another pair of jean shorts.  For my first pair, I used some fabric I had on hand.  I figured if they didn’t turn out, it wouldn’t be much of a loss.  When they were done though, I loved them!  So did my daughter!

I think one of my favorite features is the button tab.  Mine doesn’t really button, it’s just for looks.

Little Loungers Button Tab

Please ignore the wrinkles – I ironed and steamed and ironed some more!

One thing I always look for, especially in girls patterns are pockets.  You can never have too many pockets!  For this pair I did patch pockets on the front and back.

The back pockets gave me such a hard time!  I put them on according to the directions (there are no placement lines, just suggested measurements from the center back seam and the waistband seam) and they were so crooked and not lined up!  I took them almost all the way off, had my long-suffering daughter try them on and pinned them where they should be.  They looked much better!

I did an elastic waistband, but you can also do a yoga waistband and add a drawstring to it.  I love the length of these – they’re long enough that they don’t feel like short shorts, but they’re short enough for Florida summer!

I also made a pair from this light weight denim look material (modal, maybe?).  These are the knee length version and she says they are very comfy and will be perfect for winter.

The legs taper in a bit below the hip so they look kinda funny when you hold them up, but they look great on!


Get the pattern here or get the Mama pattern Linen Loungers or even better, buy both patterns in a bundle and make matching outfits for you and your kids.  The patterns are on sale through Sunday midnight (central time).

How To Sew – Getting Started

How to Sew Getting Started

*This post contains affiliate links.

Before you can begin sewing, you will need some supplies.  Most importantly, you need a sewing machine.  If you’re just learning, don’t worry about investing in the best machine you can afford.  A basic machine is all you really need – you can always upgrade or buy additional machines (serger, coverstitch, embroidery) if you decide you really love sewing or want to have additional features available or want to start selling what you make.

My current machine

My current sewing machine

I learned to sew on this old Singer machine.

My old Singer sewing machine

Some of the older machines are better anyway, so if you have Mom’s or Grandma’s sewing machine, don’t be afraid to use it.  If you’re teaching a kid to sew, don’t – I repeat do NOT – buy a cheapie kids machine.  It needs to have a bobbin  in order for the stitches to stay and not just unravel (which is totally frustrating!).

For kids, I’ve heard good things about this one, but have never used it myself.  Check this out for more information on slowing down a “real” machine to make it safer for kids.

This is similar to my machine except mine is 20+ yrs old (I have a Brother XR-34).

You will also need a few more supplies – thread, material, a pattern (unless you’re making something like a pillow), scissors and pins or clips.  You can find them at WalMart or JoAnn (they have coupons online and an app where you can find coupons).  These shouldn’t cost more than $15 – $20.

For a free pattern, check out this post about the Chloe and Mama Chloe maxi skirts.  It’s a super easy pattern – perfect for learning.  Check back next week for more beginning sewing tips and another easy pattern recommendation.

*This post contains affiliate links.  For more information, see my disclosure policy.


  • « Previous Page
  • 1
  • …
  • 8
  • 9
  • 10
  • 11
  • 12
  • …
  • 43
  • Next Page »

Hi, I'm Mona - wife, mom, teacher, seamstress, blogger. This is my home on the web. Read More…

Categories

Copyright © 2026 · The Marianne Theme By Blogelina · Built on the Genesis Framework

Copyright © 2026 · The Marianne on Genesis Framework · WordPress · Log in