SewMona

A slice of my Florida life

  • Sewing
    • SewMona on Etsy
    • Clothes
      • Boys
      • Girls
      • Men
      • Women
    • Pattern Reviews
    • How to Sew
  • Camping
    • Florida Campgrounds
  • Recipes
  • Crafts
  • DIY
  • About

Fan-Folded Leaves

IMG_1480[1]This fan-folded leaves craft was from Better Homes & Gardens several years ago.  The first time I did it was with a group of elementary age kids.  I simplified it some because it involved painting and I didn’t want to get into that with little kids just yet.  🙂  I printed out the pattern and then photocopied it onto red, yellow, and orange construction paper (you could cut out the pattern and then trace it onto paper if you’re just doing it with your kids.  I was doing it with a large group of kids).  I’ve learned that kids didn’t like to trace and I spent a lot of time tracing their patterns for them.  I thought they would be asking for help cutting, but they did surprisingly well!  Each kid had time to make two or three leaves (depending on how well they focused on the task at hand).

Anyway, first make the fan folds on the long edge (hot dog folds).

IMG_1481[1]
Then open it back up and fold the paper in half the other way (a hamburger fold – anybody else have kids that were taught this way?).  Make sure that they fold it the right way otherwise you’ll end up with a very odd looking leaf and a confused kid.
IMG_1483[1]

Keep it folded in half and cut out the leaf.
IMG_1484[1]
Then, open it back up and redo the fan folds.
IMG_1485[1]
Fold it in half so the long edges of the leaf meet. Glue (or tape or staple) the long edges together and voila, leaf.
IMG_1486[1]

The great thing about this is it doesn’t matter how you make the fan folds.  Big, little, a mix, it all works and makes the leaves unique.

Scribble Art

Scribble Art
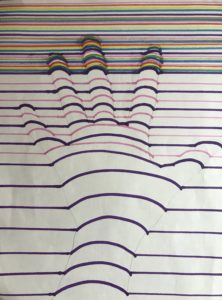
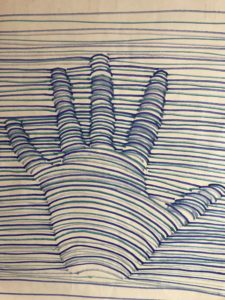
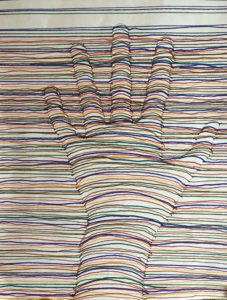
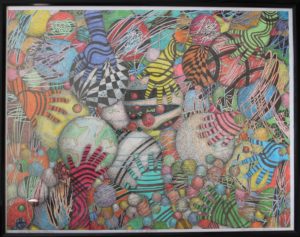
Looking for an idea to keep your kids (or you) occupied for a bit this week?  This was an art project from several years ago, but it would be a fun family art project.  All you need is some paper – whatever size you want, a pencil, and something to color with (markers or colored pencils would probably work best).

My idea for art class this week was based on something I loved doing as a kid – making scribbles and then coloring them in.  My father-in-law did the above drawing.  It has my daughters hands traced in it as well as her scribbles which he then incorporated into the design.  I certainly didn’t expect this caliber of art from elementary students, but perhaps I should have explained the scribble part better.  A lot of what they did was just scribble-color the whole page.

I envisioned something more like this:
IMG_1557[1]

My kids kind of got the idea.
IMG_1558[1] IMG_1559[1]

It was a fun and easy craft requiring no preparation and no special items.

Did you ever do scribble drawings?  What was your favorite artsy thing to do as a kid?  Do you still enjoy it?

Looking for more ideas?  Check out my other art ideas.

Art: Making a Color Wheel

Making A Color Wheel SewMona.com

Part of my “real job” is teaching art to K-8th grade.  We started off the year with a simple color wheel – not much creativity required, but they seemed to enjoy the finger painting.  All you need are some tempera paints (preferably washable!), glue, paper plates, some wet paper towels (for cleaning fingers between colors), and a piece of foil.

Primary Colors for Color Wheel

For each kid, you will need two paper plates.  Cut one of them into six pieces.  The other one will be for assembling the color wheel.

Cut a paper plate into 6 pieces.

For the younger kids (K-2), I made it super easy for them.  I put the required paint on each piece – red, blue, yellow, and then red/yellow, red/blue, and blue/yellow.  All they had to do was spread the paint for the primary colors and mix the paint right on the piece for the secondary colors.  For grades 3-5, I put the paint on a piece of foil so they had to do all the work.  I did have to explain that they couldn’t get the colors mixed on the foil – they needed to keep the colors pure and mix them on the pieces.

Put the paint on a piece of foil for mixing.

As they painted the pieces, I explained how the primary colors mix to make the secondary colors and showed them how to put them in order on their color wheel.

Paint the color wheel.

After the pieces dry, glue them to the other plate.

The finished color wheel

To make this a little more challenging for the 6-8 graders, I cut the plates into 12 pieces.  After they painted the primary and secondary colors, I had them mix a primary with a secondary – so mix red with orange to make red-orange, mix yellow with orange to make yellow-orange, mix blue with purple to make blue-purple, etc (blue-green, red-purple, and yellow-green).  These colors are called intermediate colors or tertiary colors.  They may need some help getting them all arranged on the paper plate.  I tried to make sure they placed each piece as they painted it.  It can be hard to tell the secondary and tertiary colors apart.

Color Wheel with 12 pie pieces.


This lesson is based on the Rainbow Pie lesson.

Art Project – 3-D Hand

3D Hand Art Project Craft

I saw this idea on Pinterest and had to try it.  I was surprised at how easy it was and that it really worked!  Simply lightly trace your hand and wrist onto a piece of white paper.  Pick two or three different colors for your lines.  I used markers for mine and think they work better than crayons or colored pencils.  Draw a straight line until you get to your tracing, then make a curved line.  It’s easy when you start, but when you get to your fingers, be careful that you make your curved line just in the fingers and a straight line between them.

I started by drawing straight lines with a ruler.  I space them out a bit.  Then I connect them with a curved line.  Then I use another color and draw straight lines in between the first set.  Connect them with a curved line too.  If I want a super neat look, I use a ruler for the whole thing.

You don’t have to use a lot of colors.  It works just as well with only 3 or 4.  As long as your lines are semi-straight, it will work.

3D Hand

Using a rainbow of colors will work well too!

3D Hand

3DHandArtPencil

I don’t think the colored pencils and crayons worked as well.

3DHandArtStart

Even with just a few lines, the hand starts to pop off the page.

As soon as you get lines up the whole hand, you can really see the hand popping off the page!  I tried this with the art class I teach and it worked well for the older kids (say 10+).  Younger kids aren’t as careful about the straight and curved lines and don’t have the patience to do the whole hand.

American Flag Tissue Paper Art

IMG_1731[1]

Recently we did an American Flag made of tissue paper – this would be perfect for Veteran’s Day or Flag Day or Memorial Day or 4th of July.  I found a  printable online and used that as my pattern.  Googling “American flag printable” and then looking at the images has lots of possibilities.

I gave the kids two choices – they could either do the whole flag in tissue paper or they could color everything but the stars.  To do the whole flag took a good half hour.

You’ll need to cut lots and lots of 1×1 squares of red, white, and blue tissue paper.

We did the stars first so I put a dab of glue on each star (use liquid glue, not a glue stick).

Then put the squares around an unused pencil eraser and scrunch it.

IMG_1732[1]Stick it on a star and repeat 49 more times.

For the blue background, we just put a row of blue around the edge of the stars.  If you’re really ambitious, you could put a blue in between each star.

Finally, do the stripes (remember the first one is red).


  • 1
  • 2
  • Next Page »

Hi, I'm Mona - wife, mom, teacher, seamstress, blogger. This is my home on the web. Read More…

Categories

Copyright © 2026 · The Marianne Theme By Blogelina · Built on the Genesis Framework

Copyright © 2026 · The Marianne on Genesis Framework · WordPress · Log in